
Last Updated on April 1, 2024 by Sharaj
Mitre saw (also known as Miter saw outside the UK) is all about the crosscuts and miter cuts. it is one of the best tools to cut tight-fitting joints on mouldings.
So, whether you are making windows, doors or cabinets, you can get the sharp joining cuts using a mitre saw with right blade adjustment.
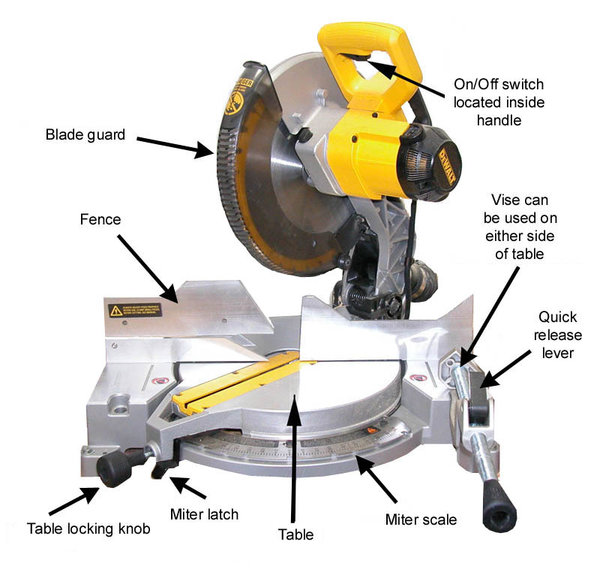
Mitre saws are simple power tool that has a handsaw built on their platform that also has a blade slot, fence and working table.
Power mitre saws are easy to operate and are better in terms of functionality because their blades can move 45 degrees to either side. Then comes compounds mitre saws that give you both mitre as well as bevel cuts.
As with all other power tools, mitre saws also need some practice and skills, so that you can use them to get the desired results. So, try working on some scrap wooden blogs before you go real.
Mitre Saw Uses Tips
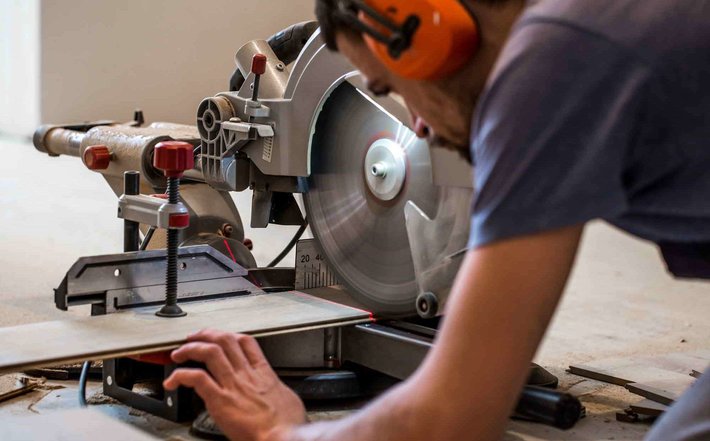
A mitre saw cannot cut anywhere freely like a circular space. However, it possesses great power and can ruin your project if you don’t hold the workpiece properly. If you are not attentive, it can also be hazardous for your fingers. Keep in mind that mitre saws are only suitable for crosscuts. For rip cuts, you should always use a table saw. Follow the given tips for proper setup.
- When you purchase a new mitre saw, check its blade alignment before you start working on any project. These machines come with factory adjusted blades that might leave their position during the transport and delivery.
- Set the mitre saw on a stable and plane surface. You should also bolt it if you are using the saw in a workshop. If you are placing it on a stand, then make sure the saw is clamped properly.
- Never clamp both the side of cutting material. Use both your hands while cutting; one to hold the materials and operate to the blade. Never try to cut freehand, even if you are confident about the results.
- Keep the mitre saw powered off and unplugged when you are not using it.
- Use sharp blades. Most of the mitre saws are meant only for wooden materials. Refer to its manufacturer’s manual to know the parts, their workings and other precautions.
- Keeps your hands away from moving blades.
- Never wear jewellery or loose clothes while working on a mitre saw.
- Wear safety goggles and hearing protection while operating any of the power tools.
- Wait for the blade to stop spinning when you have to clean the working table. Never try to reach near the blade when it’s moving.
- Always make sure that the blade guard is at its place and the emergency power button is active before you start working on a mitre saw.
How to Make a Mitre Cut?
One of the best uses of a mitre is to make crosscuts against the grain of a wooden piece. Mark the angle using a pencil, because the mitre gauge available on mitre saws tend to deflect one or two degrees unless you have an industrial-grade variant. In other words, drawing lines using a scale is better when you are making mitre cuts.
Once you mark the wooden piece, place it on the saw table against the fence. Unlock the mitre handle and set it to the required angle. Lower down the blade, match it according to the existing angle of the mitre handle.
Lift the blade, pull its trigger, wait until it reaches the maximum speed and brings it down slowly through the wood. Leave the trigger, lift the blade, wait until it stops moving and take out the wooden piece.
How To Use a Compound Mitre Saw?
Compound mitre saws are no different than other mitre saws, but they have an added functionality. They can bevel and mitre cut at the same time because both of these controls are independent of each other.
As we know you can make bevel cuts by aligning the blade at any other angle apart from 90 degrees. In a compound cut (mitre and bevel at the same), you have to depend on the mitre gauge because it’s not possible to use any other tool to match the angles.
When you need to make compound cuts, the first step is to mark the cutting line with a pencil. Set the mitre angles and then the bevel angle. Place the wooden piece on the table against the fence, and cut following the steps we were discussing earlier. Adjust the bevel angle, set the mitre angle and use the blade to cut the wooden piece. Simple to use, but the compound mitre saw provides you with effective results.
Tips for Safe and Quality Cuts
A mitre saw has a straightforward usage, but it always gives you the desired results. Especially if you follow the proper procedure of marking the cuts, set proper blade angles and hold the work piece well. However, it’s only true to get regular mitre or bevel cuts. You need to follow some unique steps, when you are looking for other cuts. When you will work on a major project, bevel and mitre are not the only cuts you will face. Let’s discuss some of them here.
Cutting small pieces. You should not use a mitre saw to cut pieces smaller than 8 inches. But, you need such small pieces with mitre cut on both the ends, especially when you are installing baseboards or similar mouldings. In such situations, you can use a long piece of wood and cut its first end. Then, change the blade settings to make the cuts on the same log according to the requirements.
Cutting very small pieces: When you need to cut wooden pieces less than one inch, then you should use a sacrificial board. Set the board against the fence and hold the cutting pieces in front of it. Cut both the pieces and you will get the smaller part that you need.
Make crown mouldings: You need to hold the wooden material against the fence at the same angle it will attach against the wall or corner. When you start making the crown mouldings, you will hold it the corner created by the saw table and its fence. When you are working on a long piece, make sure you support its both ends to get accurate mouldings. You can always use a jig to hold the crown mouldings, because the inbuilt fence is sometimes not tall enough to give you comfortable cutting positions.